Saturday, September 19, 2015

I've been gone since forever... (A lil update)

Hello everyone!! I realized that some of my photos have become broken for some reason too but I have no idea what photos they're supposed to be I'm so sorry


I never got to finish my September Project (I'm such a lazy bum and all my lens expired in September ((to my dismay)), kill me right now) 

but I promise that I'll put up tutorials whenever I can (if only someone could sit me down and go like 'bij do your fakkin makeup')


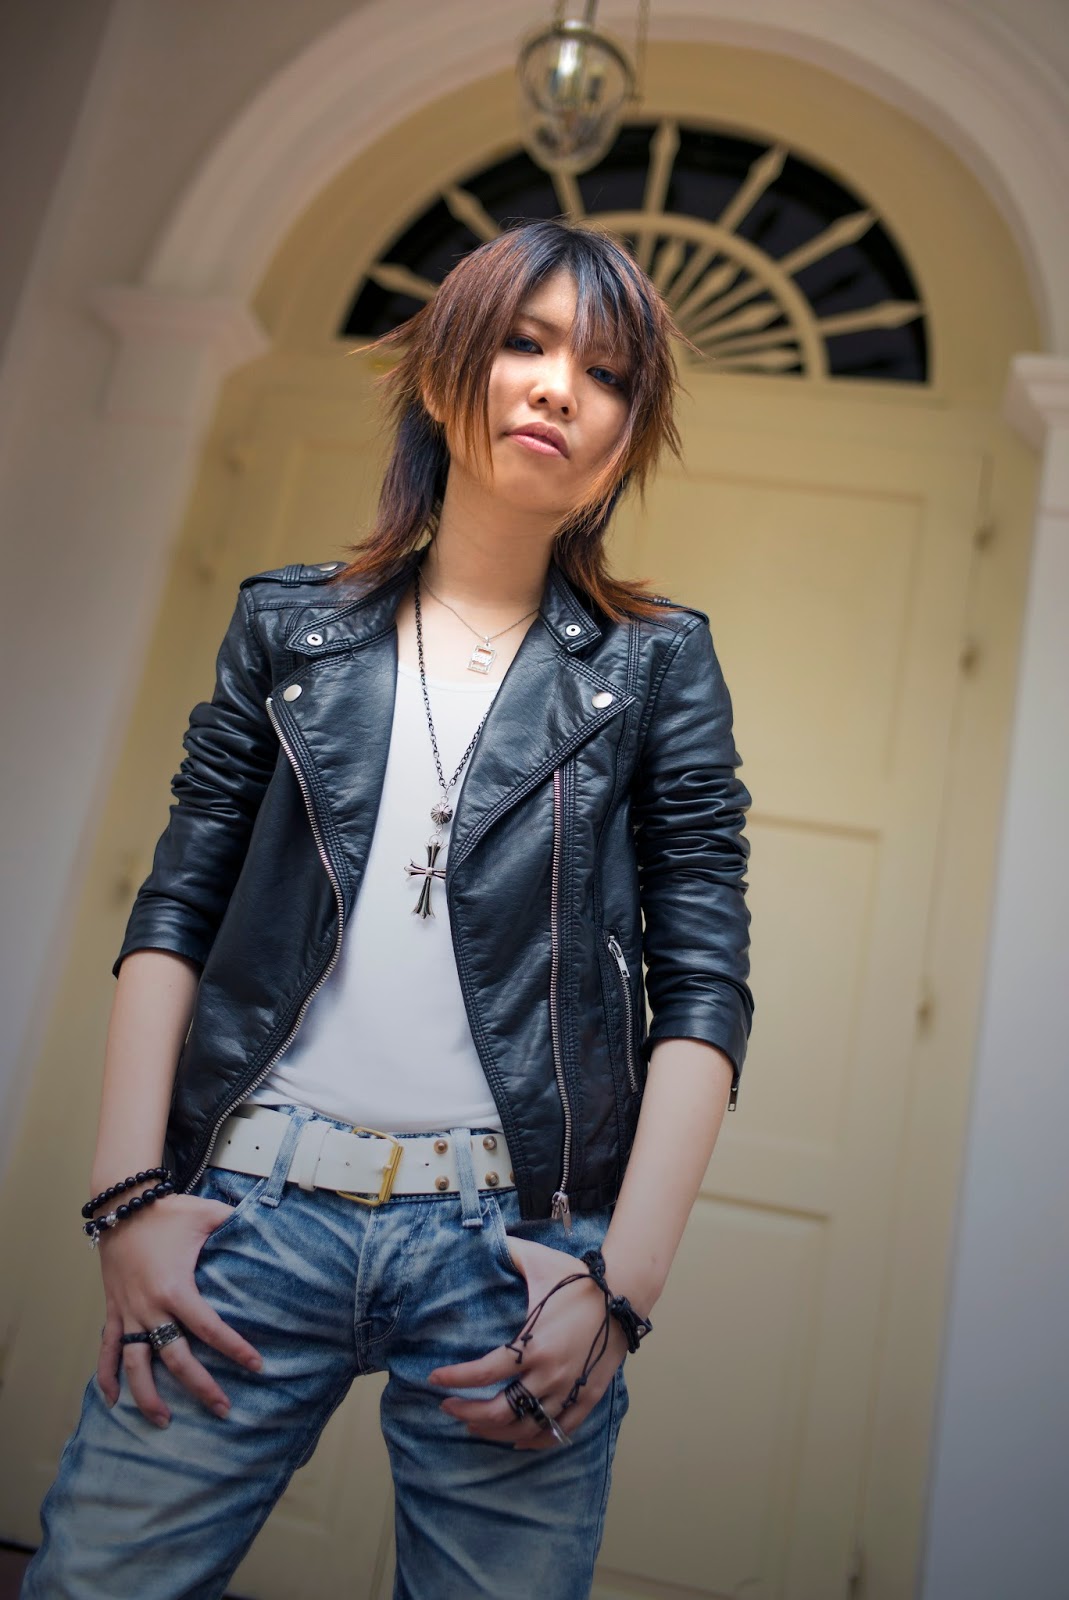
Since I've been neglecting this blog for so long, I thought I'd put up some pictures that I haven't done so yet!! I realized that I never put up my photos from my Visual Kei shoot...

So here they are! feat. my princess Yuuki \o/

Of course, styling, makeup and concept by me *^^*

I started off the day with a more natural look then intensified my makeup midpoint of the shoot, so do expect a whole spam of photos ahead >:)


(Omakes are neccessary, yes)


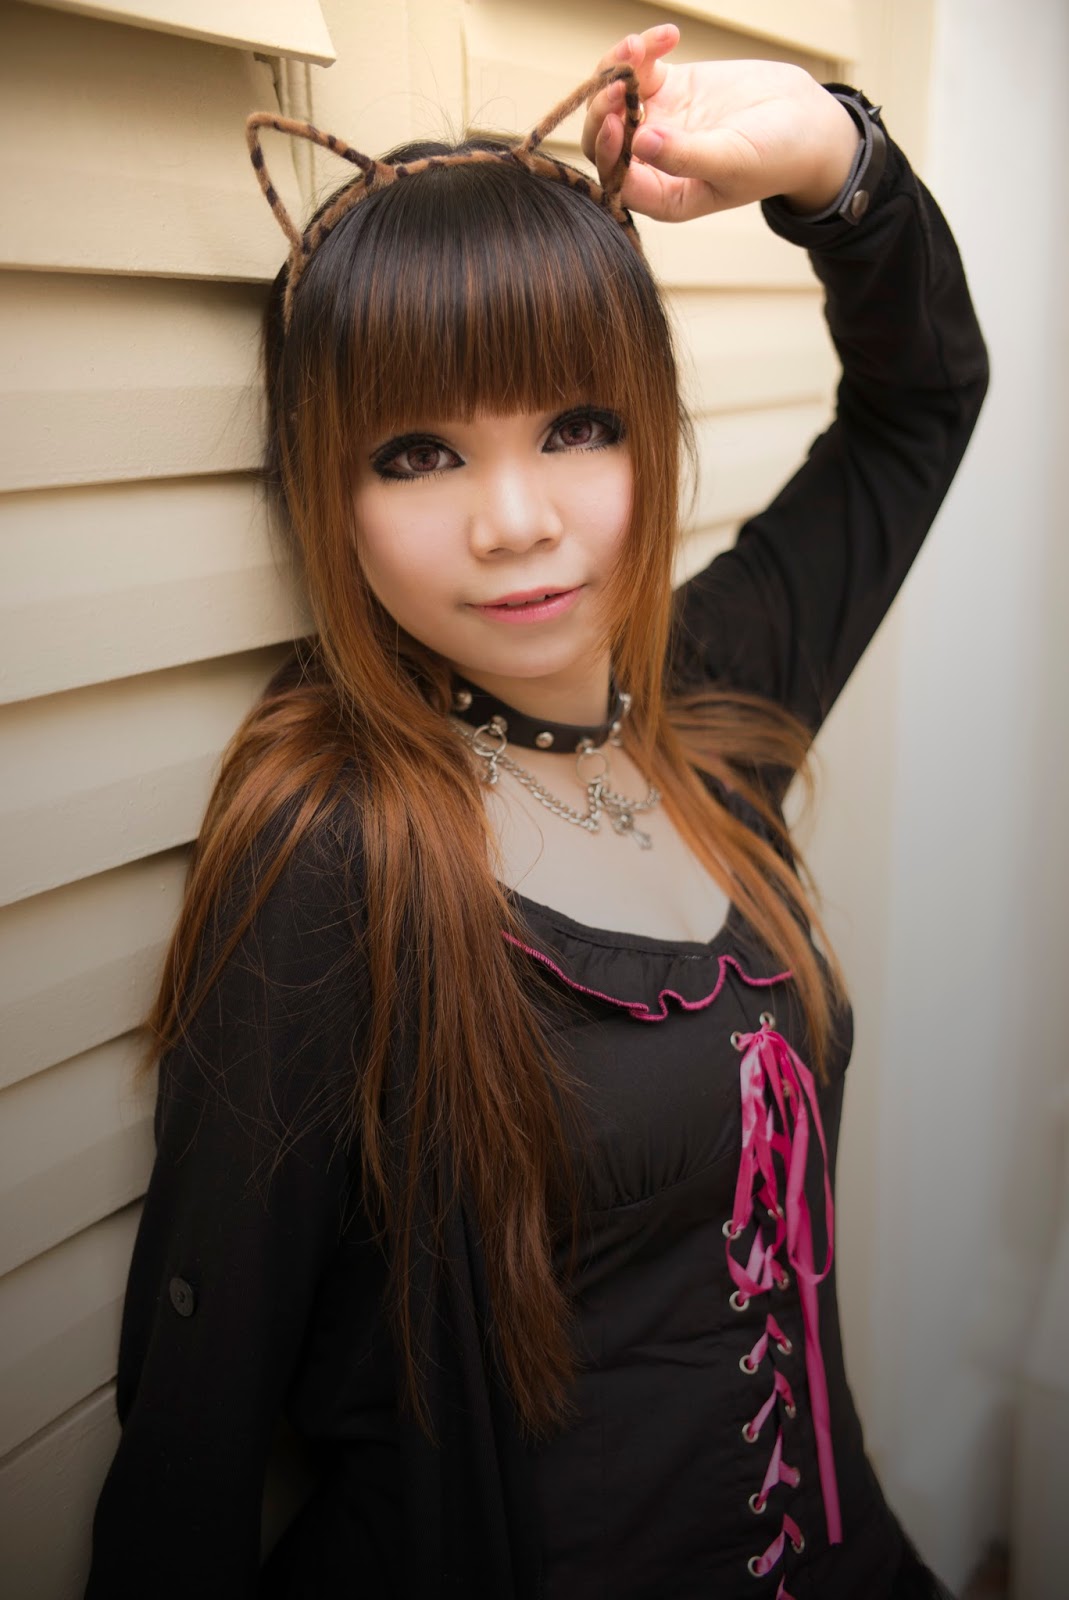
HALF TIME!! We took a break here, as you can (or cannot) tell we moved from Bugis MRT to outside NLB to CHIJMES and lastly *Scape...we took a break at the HQ area, before moving on to the darker part of the shoot. Although Yuuki is always pretty and un-dark anyway (that is not a word.)


Just in case you are starting to think that Yuuki's shorter than me...

(weeps tragically)

Unlike the previous Otona Gal shoot, I'm not sure if this can be called a concept shoot..we went to lots of places for photos, there's many many more I shortlisted to edit from the 2nd half but maybe next time when I feel like it!

If anyone's wondering, yes as always the makeup has been inspired by various bandmen. Yuuki's is inspired by ex. VAASTU bassist, Siori. I've done a version on my own face before:


If requested I will try my best to do a makeup tutorial for it!! It's pretty simple to be honest, one tip however is to apply falsies before drawing the almond eye shape with your gel liner! I find this method best for people who are seeking to changing their eyeshape with liner, since it might get abit tricky to get the right angle and all on your first try.

Sticking on your lashes first will give you a rough gauge on where to extend your liner to! :) Also please don't try this look without lashes it looks super bad (said from experience)

My normal makeup look was inspired by LEZARD Natsume. I don't have the picture which I used as reference anymore, but feel free to check him out on Twitter because he's such a beautiful human being. In a crazy, weird band.

Finally, my own Visual Kei makeup was inspired by ex. Xepher drummer Setsu! I noticed that my eyes seem to fit heavier Visual Kei makeup looks more (I'm so so sure it's because my eyelids are thick) 

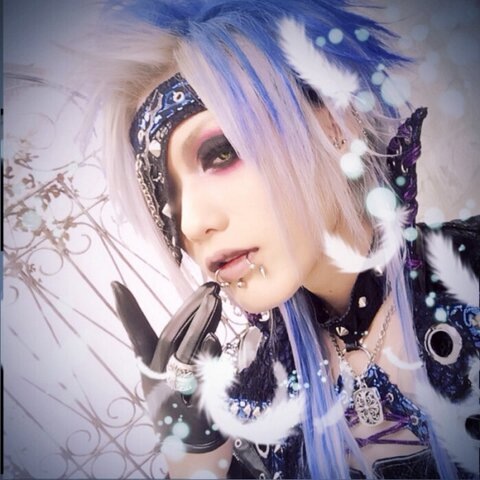
(Bless Setsu I love his makeup 5evr)

Here's once I tried before the shoot itself

It's pretty simple to achieve, if you follow my steps from the Visual Kei eyemake tutorial and basically extend the gel liner under eye, as well as add gradient with the red eyeshadow -- tadah! I used Sugarpill's eyeshadow palette to achieve the bright red effect here, really love their bright colours and how well it shows up even without initial primer /o/ \o\ 

As per usual, I will make a tutorial for this if there's a demand

Chekis for sale! ... not. I did not take chekis. I'm sorry. 
This is also a bad joke.

With that, I end my short update post here. Short...update post that looks long because there are a lot of pictures.

If you guys follow me on my social media you would've known that I was in Japan for a little over a month back in March-April, I'll try my best to share my experience on my blog as much as I can, but since I was there on a private internship there's a lot of things that I can't reveal (without getting a good bashing from fangirls too)

But for now, signing off to eat more ice cream!!!


Thanks all for reading ♡

VISUAL KEI PHOTOSHOOT. // 20th August 2014
Model: Yumi, Yuuki
Photography: Vansmo
Post-Processing & Editing: Yumi


♥︎Yumi~.

Monday, September 15, 2014

Visual Kei goodies!? Band Merchandise (vol. Accessories)

Hi guys! I'm back today (I totally forgot to post about my other blogpost being up....) with something a little different from the usual. 

As many of you might know I'm a big fan of Visual Kei, ever since my trip in 2013 I've been starting to listen to more indie bands and feel my money depleting away ever so slowly. /weeps

During my trip last year, this year and other instances such as Visual Kei band lives in Singapore, webstore shopping...I'm proud (not my wallet however) to own a wide variety of stuff now, although these are only from several bands that I listen to and not all!

I figured that since I've never blogged about them before and people love seeing my Visual Kei stuff that I do one today instead of the usual September Project posts :) Of course, I'll still be continuing on that, in the subsequent posts!

Introducing to you part of my Visual Kei collection, the accessories! :)

I need more of these really.

What I own:
SuG scrunchie ; bandana
LEZARD scrunchie
landz. scrunchie ; star necklace
LM.C bandana ; light bracelet ; MIDI rings
Alice Nine light ring ; MIDI ring
ViV light rings

It's a pity that I don't usually use head accessories. I found the SuG bandana in Closet Child Harajuku back in 2013. I really like Closet Child (you should give it a visit when you're there!), you can get lots of secondhand stuff there at reasonable prices. Ranging of CDs to magazines to band merchandise, of course! 

The LM.C bandana on the other hand was bought when I went for their live at Shibuya AX in March 2014. It was a VisuAni event, and my friend and I actually got the tickets before the whole line-up was out. So when Gaijin John-san announced that LM.C would be one of the bands playing...gosh I went bonkers. Haha!

Love the designs. SuG's is from Thrill Ride Pirates whilst LM.C's from Perfect Fantasy!

It was my first time watching LM.C in March (I missed their live with SuG in 2010), and although I was pretty far behind it was a good experience all in all. I also watched Jin-Machine for the first time at that live, they're pretty ridiculous. But they play good music. HAHA!! If you like Golden Bomber's music style, you should give them a try!

How I wore my SuG bandana to the Update Ver. 0 live-screening

I like to wear my bandanas either as a scarf or a bunny-ear head accessory, though the latter is only because Maya does that with his bandana as well.

How I wore my LM.C bandana in Japan :3

Of course that's not all, I bought quite a few things from LM.C's goods table because it's not everyday I get to buy from them, right? My friend broke her umbrella because of the crazy wind that day so I bought an umbrella...although it wasn't even raining after the live.

LM.C and Alice Nine's midi rings!

Bands deciding to produce MIDI rings as merchandise is probably the worst news for my poor wallet. I love collecting accessories, so I really couldn't take my eyes of the LM.C MIDI rings when I saw them...I actually overlooked them at first. TT__TT /could have saved money

I used to own another Alice Nine MIDI ring, but I lost that on the flight to Japan in March. So to console myself I bought the LM.C MIDI ring set, which only cost 600yen, surprisingly. Both designs are the same except one is gold-accented and the other, silver-accented.

I also own the Alice ring from Supernova Symphonia's Ali-can. I have the Nine ring as well, but I gave that as a present to my friend.

Beautiful rings ;3;

It was a miracle that I actually got the Alice Nine MIDI rings, they were by random! However I don't usually wear gold-accented accessories and the Ali-cans actually sold out before any of the Standard ticket holders could get them, so I wanted to share some joy with my friend. Hehe.

Besides MIDI rings, there's the normal size rings (they don't look normal sized I know) of course!

However these rings aren't just any kind of rings, they're light-up rings for live performance use. I wasn't supposed to buy the Supernova Symphonia ring but my itchy hands said "BUY IT".

Alice Nine and ViV's light rings!

There's generally 2 types of the light-up rings, one is the plastic, box type (Alice Nine's) that has a standard light. Usually bands that play more of the generic, or hardcore Visual Kei music would have this kind of rings as their merchandise.

It glowssssss!!!!

On the other hand, the rubber type that comes in various colours and shapes are the flashing light rings. Usually bands that play Oshare Kei, or Kira Kira Kei music use this kind of rings! To name a few, ViV, Kameleo...

The flashing light rings are usually more generic in design so you don't need to be afraid of people calling you out for using another band's merchandise at a live. Though honestly, I don't think it matters. The bad thing about these, though is that it can melt or mould under heat. So those who own these rings, take good care of them!!

Another bad thing there is about these rings is that you can never change the batteries, which is a bummer. But I guess that's how the bands keep getting fans to buy more! :x

LM.C's light bracelet and landz.'s light necklace

There's never something called too much light! I'm not sure why I bought these either but I do wear them to various lives for the sake of being shiny. Haha!

I double up the landz.'s light necklace as a normal necklace sometimes. What I like about it? It has 3 different light modes, so depending on the tempo of the music you can adjust your necklace's light mode to suit it. Cool, huh? I think I used to have something similar in kindergarten, actually. xD

L > R: landz., LEZARD, SuG's scrunchies

I still don't get the function of scrunchies at lives, truth to be told. But I'm obsessed with these stuff because I love accessories. I do use them for my hair, but these lovelies double up as pretty "bracelets" as well.


Fashion inspiration anyone?

Out of the 3 scrunchies that I own at the moment, my favourite is the landz. scrunchie. They actually have 4 different designs, this one being Towa's design. The tag used to say landz. on it but as I use it too often the tag has already faded...

Why I love it? It's made of red velvet. I think it's really rare to find scrunchies made using velvet cloth. I fell in love with it when I saw Towa wearing it on his wrist at the live I first saw landz. at, so even though it was my first time seeing them I just had to buy it. xD Which is a decision I don't regret, landz. is disbanding in October so I won't be able to ever see them again, so I'm happy I decided to buy their merchandise that day.

Unfortunately, no giveaways! (yet?) I'm trying to sift through my collection to see if I have anything up for giveaway, so stay tuned for more! 

And with that, I'll see you in my next September Project blogpost! 

Thanks for reading as usual and bye!~

♥~Yumi.

Friday, September 12, 2014

#SEPTEMBERPROJECT : OOTD #2

Hi guys!!

I'm back after a week of MIA-ing. This week's been so hectic I haven't did my makeup tutorial, but I'll have it up by Monday latest. Aiming for Sunday evening! 

I hope you guys enjoyed OOTD #1 and Makeup Tutorial #1. I apologize that the first makeup tutorial wasn't done on both eyes, my left eye was giving me problems so I didn't want to touch it...thank goodness that the next few tutorials won't require it :)

So here's OOTD #2, a look that I used for punk rock styling for a photoshoot at Pearl Centre. :) Not sure if you heard the news about the murder, I'm kind of sad because it's really a great place for photoshoots but I'm so scared to go there now. Haha!

So here's OOTD #2! Interested to know how I match my clothes and where I get them? Read on!

#SEPTEMBERPROJECT

OOTD #2 : PUNK ROCK

Photo: Zech Light Art

Union Shirring Long Tee: SUPER LOVERS
Ripped Shorts: SUPER LOVERS
Choker & Necklace: glavil by tutuHA
Hair Accessories: glavil by tutuHA / creepsville666
Rings: SUPER LOVERS / LM.C / Chrome Hearts / Unbranded
Other Acessories: Unbranded
Coltranes: Jeffrey Campbell

To be very honest I didn't decide on my outfit till the day of the photoshoot itself HAHA. This photoshoot was a few weeks after I came back from my Japan trip in March 2014, so I really wanted to use the clothes that I had gotten during the trip for this photoshoot.

If you guys know me well you'll probably realize that although I sport a lot of different styles my closet consists of mainly: black, black, more black. I've been trying to change this but I end up getting white instead LOL /neverchange

Photo: Zech Light Art

SUPER LOVERS is one of my favourite brands (along with LISTEN FLAVOR and glavil by tutuHA) plus I have a friend who was working at the Laforet Harajuku branch (she quit in July), so even if I didn't buy anything I wanted to visit her once in March.

But let's be honest why would I not buy anything? xD Although the weather is super hot in Singapore I'm more sensitive to cold than others (not to mention the power ranger aircons in my school) so the Long Tee was really tempting for me, plus it was on sale. 


What I really like about the Long Tee is that even though it has a girly cut the overall feel that you get after wearing that is still slightly tomboy-ish. Plus I have a thing for nice designed clothes with thumbholes! It makes it easier for me especially since my arms can be kinda short in some clothings, including this.

Unfortunately I'm not able to give you guys a cheaper alternative for this item :( However if you're interested in purchasing this you can always grab yours at CDJapan while stocks last! :)

Link:
http://www.cdjapan.co.jp/product/NEOAPP-35601

I bought the ripped shorts along with it as well, although the cutting was a tad too big for me. (It doesn't slip off or anything though)

(no thanks to extremely mabushii lights for destroying photo quality)

I have the ripped jeans version of this, and I just love how Super Lovers adds studs to the sides of the ripped jeans, plus the metal hook under the belt area for easy wearing of chains or other accessories.

Unfortunately this is already out of stock :( However you can easily DIY an inspired version with a pair of black ripped shorts and studs from Taobao (or you could buy them locally at Chinatown or *scape!).

Photo: Zech Light Art

When choosing accessories for punk rock styling literally almost anything metallic goes. Chains, studs, spikes and crosses are your best friends in punk rock fashion. Go for silver accented accessories instead of gold, gold tends to have a more sophisticated feel, while silver being more grunge.


This choker and cross necklace from glavil by tutuHA are literally my babies I don't understand why I didn't buy them last year. HAHA. I wear them so often I can't even remember the number of times I've worn them!

What I really love about these 2 accessories, especially the cross necklace is the thickness of the chains. Usually for necklaces you wouldn't get these kind of chains with it but this, plus the size of the cross itself makes it an awesome statement piece. The length of the chains for the choker also automatically makes it look larger overall, and it's all about being loud with metals in punk rock.

Like with the SUPER LOVERS items I don't have a cheaper alternative for everyone :( However if you would like to purchase it you can go through this page on Facebook called Gorgeous Barbie. :) The handcuff choker has 2 different colours while the cross necklace comes in a variety of designs. Do check out! (Warning: Expensive as heck ;w;)

Link:
https://www.facebook.com/media/set/?set=a.405498232823418.92572.131888843517693&type=3

Besides the choker and necklace my devil horn headband is also a piece of tutuHA! Though I think this is also already out of stock. I don't usually sport headbands because I hate my hair getting flattened but it felt fitting for the occasion. The thing that makes it different from other devil horn headbands is that the horns itself are actually cushioned, so it gives a more full effect compared to the wired 2D ones (plus it's squishy)!


The skeleton hands are from creepsville666. I won't talk more about it, you can easily get this on Taobao at almost any Harajuku style accessories shop!

Photo: Zech Light Art

I don't have a proper photo of my accessories. As you can see from the photo though, my studs bracelet is spiked as well but that's broken now so...replacement.

I collect my accessories for punk rock style from everywhere and anywhere. The metallic ring that you see in the photos is actually a Super Junior Yesung fan ring from Comics Connection LOL


As mentioned earlier, go for accessories with more silver accents. I wanted to add a bit more colour to my coordinate, so I threw in a spiked rose bracelet as well. That thing can kill, by the way.

I get my accessories from *scape, Taobao, Closet Child (a secondhand shop in Japan), SUPER LOVERS and at any accessory store in Singapore. Give them a try, you'll never know what you'll find!

Maybe one of the more unique items out of these accessories is the midi ring (it's together with the Chrome Hearts ring). It's actually band merchandise from the Visual Kei band LM.C. They have super cool merchandise (I'll probably do a post about band merchandise I own one of these days) and this midi ring, along with another gold accented one was 600yen in total. (That's less than $10, about $8) so I was really excited when I saw them selling this at the live. HAHAHA

I've actually linked 2 of my favourite accessories stores on Taobao in my previous OOTD post, but in case you missed out here's the links again! The spiked rose bracelet is from the first link.

Links:

I've probably never talked about this before, but I have an obsession with spikes and garters. Although I don't wear them often (/shoots self) I love them so much! 


These 2 are actually the first that I bought, I have tons more now. Because I had a stockings fever once (I still do, but I'm so scared of ripping them I don't wear them much anymore. Bummer.) I didn't really go for those with clips, plus the knee garter was really interesting to me.

Because for the photoshoot I decided on the vertically lined black stockings it was a miracle that the spikes on the garter alined exactly with the stockings. I really liked the overall feel of them together, made me feel more dangerous. Don't go around knee-ing people with these on!

Here's some shops that I frequent to buy these lovelies.

Links:

Photo: Zech Light Art

Shoes, stockings, bag? Explore your closet! Jeffrey Campbells are really expensive so unless you have the money to afford one. These are the coltranes, you can probably find cheaper alternatives on Carousell if you search jeffrey campbell coltrane. Harajuku model Seto Ayumi's favourites. I don't really have a bag to recommend for this look so....(ahahahaha)

It's 4AM now so I shall head to bed. And wake up 2 hours later..../cries

Hope you enjoyed reading this, good night and have a good night to everyone! (when this post is uploaded) Second makeup tutorial in relation to this look will be up on latest Monday evening.

Seeya~!


♥~Yumi.

Sunday, September 7, 2014

#SEPTEMBERPROJECT : MAKEUP #1

Hello guys! As usual I'm late by a day again /cries

Thank you for reading the first post of September Project! I hope you got a few tips from there, if not a few good stuff to buy haha :3

Here's the first along awaited makeup tutorial! I'm going to be starting with 3 of my daily eyemakes. If you guys know me or follow my Instagram you'll probably know that I dress up to school on a near daily basis (unless I get really freaking tired in which that case I would wear a mask instead).

To those who are looking for a suitable makeup style for you cute-sey coordinates, here's one for you! I'm very inspired by AMO, the Japanese Harajuku Model in terms of girly fashion. In her looks she always has a really dreamy yet adult-like feel which I love to re-create. 

Photo: Love Drug Store x AMO Collaboration

AMO's eyemake is all about natural; brown and pink toned eyeshadows, brown eyeliner, brown falsies. Other trademarks in her look is her pouty pink lips, straight eyebrows and of course, full blast on the blush.

So here's my take on how to achieve a look like AMO! I'll be skipping the mascara and falsies, because after all this is a daily eyemake tutorial and I hate wearing those to school. I'll also leave some suggestions down below on what I used for each part of my makeup tutorial, but it's really up to you to play around with what you have to recreate this eyemake!

Have fun!!

#SEPTEMBERPROJECT

MAKEUP #1: CASUAL ADULT GIRLY


What I used;

1. SilkyGirl Blockbuster Eye Palette

(Not available in stores anymore)

For this look, I used:

Orange-toned brown eyeshadow, 2nd from top for my base eyeshadow (Step 1)
Chocolate brown eyeshadow, 3rd from top for 1/3 of the outer lids (Step 2)

2. Urban Decay Naked 2 Palette

(Available at any Sephora stores)

For this look, I used:

Pink-toned highlighter BOOTYCALL for centre of my lids (Step 3)
Grey-toned brown TEASE to accentuate under 1/3 of my lower lashes (Step 4)
Cream colour highlighter FOXY for my waterline and browbone. (Step 8 & 9)

3. Koji Dolly Wink Pencil Eyecolor Cream Glitter

(Available at Watsons Singapore)

I used this to highlight along the tear duct. (Step 5)

4. Koji Dolly Wink Liquid Eyeliner in Brown

(Available at Watsons Singapore)

I used this for the base eyeliner. (Step 6)

5. Majolica Majorca Perfect Automatic Eyeliner in Pink

(Special Edition Colour. Still available at Watsons!)

I used this for my second layer of eyeliner. (Step 7)

6. Candy Doll Shading Powder

(Available at Watsons Singapore and BHG)

I used this to contour the sides of my nose (Step 10); as well to contour my face!

7. Candy Doll Cheek Colour in Pink Flamingo

(Available at Watsons Singapore and BHG. 
They've ceased manufacturing for this version, get yours quick!!)

I used this for my blusher.

To achieve AMO's full-blast blusher look, use a more compact blush brush to apply on the cheek colour generously. If you have a longer face unlike AMO's, try sweeping the blush vertically downwards as well. It creates the illusion of a rounder, cuter face!

8. Koji Dolly Wink Mascara in Brown

(Available at Watsons Singapore)

For me, I used 01 Long for my lashes. However, if you own 02 Volume, go ahead and experiment and see if it fits you better!

9. EYEMAZING x AMOYAMO Eyelashes No. 813 in Rose Chocolat

(Available at BHG)

I used these falsies for this look; it gives an overall natural feel plus it's heavier on the outer section, which creates the illusion of longer eyes instead of bigger eyes. However, if you have small eyes you may want to invest in brown eyelashes which are heavy on both the outer and middle section.

10. Etude House Dear Darling Tint in 02 Real Red 

(Available at Etude House)

I used this for my lips, but only applied this on the inner part of the lips. Use your fingers to blend out the colour to give your lips a gradient colour!

11. Etude House Dear My Enamel Gloss in 02 Super Shiny Pink

(Available at Etude House)

Lastly, I applied this all over my lips to give my lips a fuller, pouty pink feel!


And that's it from me for the first makeup tutorial! I'm sorry that I did not do a full one inclusive of falsies, blush and lips! I don't usually put those on a daily basis...but I did leave a few tips in the descriptions of the products, so please take a look if you're interested!

If you ever try out this look, please do tag me @Inamura_Yumi on Twitter because I'd look to see other people's take on this eyemake! And with that, I will see you in my next blogpost.

Thank you for reading the second post for #SeptemberProject! 


♥~Yumi.